Load testing is very difficult to get right and probably one of the more exciting types of testing that one gets to do. The most popular load testing tool is Apache's JMeter but in my experience Tsung allows me to squeeze more juice out of my machines and the fact that it is very easy to setup makes it a winner in my books.
Installing Tsung
You can find instructions for all erlang supported platforms here and the instructions for installation on Ubuntu are as follows:
# install sphinx document generator
sudo pip install -U Sphinx

# install dependencies
sudo apt-get install build-essential debhelper \
  erlang-nox erlang-dev \
  python-matplotlib gnuplot \
  libtemplate-perl

# grab the binary
wget http://tsung.erlang-projects.org/dist/tsung-1.6.0.tar.gz

# make the package
tar -xvzf tsung-1.6.0.tar.gz
cd tsung-1.6.0
./configure
make
make deb
cd ..

# install
sudo dpkg -i tsung_1.6.0-1_all.deb

# check to see if it installed ok
tsung -v
Note: There is a tsung package available for both Debian and Ubuntu, but using it can cause problems with mixed erlang versions so I would highly recommend simply building it from source. Also, when running a distributed setup please ensure that the erlang/tsung versions are exactly the same.
Getting started with Tsung
Setting up a tsung test scenario is done via xml, which is then executed to produce a series of output files which can then be used to produce a graphical report.
If you want to sample the actual traffic being generated to make sure it looks correct, use dumptraffic="true" attribute on the top-level tsung tag, but do not use this for actual testing, because it slows down Tsung to a crawl.
<?xml version="1.0" encoding="utf-8"?>
<!DOCTYPE tsung SYSTEM "/usr/share/tsung/tsung-1.0.dtd" []>
<tsung loglevel="warning">

  <clients>
    <client host="localhost" cpu="2" maxusers="10000000"/>
  </clients>

  <servers>
    <server host="localhost" port="8001" type="tcp"/>
  </servers>

  <load>
    <arrivalphase phase="1" duration="2" unit="minute">
      <users arrivalrate="400" unit="second"/>
    </arrivalphase>
  </load>

  <sessions>
    <session name="load_via_db" weight="1" type="ts_http">
      <request>
        <http url="/api/cities/Armenia" method="GET" />
      </request>
    </session>
  </sessions>
</tsung>
As can be seen, one specifies the rate of arrival of clients and how long they remain, rather than specifying the number of simultaneous connections explicitly!
Running
Before firing up Tsung you might want to make sure that your machines can actually generate a large amout of concurrent requests. For my case, I needed to up the number of open file descriptors for my system. This was done by editing /etc/security/limits.conf to set the nofiles hard limit to 65000. You will need to relogin for the changes to take effect and the new limit can be set via ulimit -n 65000. Now we're ready to run:
mkdir tsung-logs
tsung -l tsung-logs -f scenario.xml start
It takes some time to generate reports after the load is done, so be patient - for example, if you run the actual load-testing for 1 minute, then tsung finishes running in about 2.5 minutes. You can watch its progress by tailing the tsung.log file in the output directory it mentions when you start it.
Reporting
Tsung can generate an html report based on the log directory via the following:
mkdir scenario-output
cd scenario-output
/usr/lib/tsung/bin/tsung_stats.pl --stats /npq/wheresvic.net/load/tsung-logs/20150826-1637/tsung.log
chromium-browser graph.html
Update September 5, 2015
Here's a sample graph: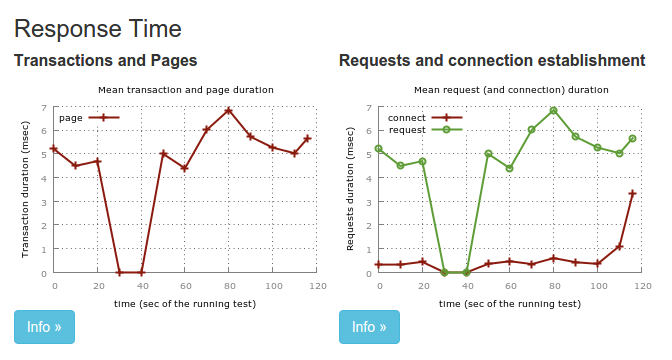
Distributed setup
You will probably want to run Tsung from separate machines to properly load test your production setup. To do this, you need to ensure that:
- Erlang and Tsung on all the machines are installed and have the same versions and be at the same locations.
-
All machines must have passwordless ssh login enabled (e.g. by exchanging public keys):
# other hosts ssh-keygen ssh-copy-id tsung-2 ssh tsung-2 # localhost ssh-keygen cat id_rsa.pub >> ~/.ssh/authorized_keys # disable ssh from starting immediately echo manual | sudo tee /etc/init/ssh.override - All machines much have exactly the same user (name) created in the system.
- All machines have hostnames configured for each other because the tsung configuration demands host names and not ips.
<clients>
  <client host="node1" cpu="2" maxusers="10000000"/>
  <client host="node2" cpu="2" maxusers="10000000"/>
</clients>
Wrap up
There is quite a bit more that Tsung can do for you, such as simulating actual user behaviour and actions but I think that this much should be enough to get you up and running for now.